Monday, April 27, 2009
Sunday, April 26, 2009
Easy Apple Dumplings!!
This recipe was shared by my grandma...I don't know where she got it..but it's the ONLY thing she's ever had a RECIPE for...my grandma doesn't like recipes and does everything from memory..because she's that awesome!! She can even add love to a store bought pie..and make it taste like it was grown, picked and made from scratch!!
Apple Dumplings
Ingredients:
1 can Crescent Rolls
1 can Mountain Dew (or A&W Vanilla)
1 cup Butter
1 cup Sugar
2 Tbsp Cinnamon
1 can Apple pie filling
Directions:
Preheat oven to 350°. In a bowl, cream butter, sugar and cinnamon. Unroll crescent rolls and place in a 8 x 11 pan. Put a slice of apple (from filling) in each crescent roll along with a spoonful of the butter mixture, roll crescent tip down and pinch bottom together, continue until all crescent rolls are filled. Place all extra apple filling in the open spaces in the pan, top each roll with remaining butter mixture. Pour the can of Mountain Dew/A&W over entire pan. Place in oven for 45 minutes to an hour.
(Optional)- add a scoop of yummy ice cream!!!
-----
Don't forget to stop by tomorrow...to see the fresh outta the oven pic!!
~*Carlee Rachelle*~
Friday, April 24, 2009
Score 1 for Homemade!!
After a request to have business cards placed with my lip balms.
I decided to make my own and I'll share it with you. I decided to make mine dual purpose: business card/coupon.
Ingredients ;)
First - get cardstock (I decided to get mine from walmart..it's the only thing in town and I'm impatient) :P (it was 110lb which is a little lighter than normal, but still a great thick feel and it was 5.95 for 150 sheets)
Second - get business card template @ http://www.avery.com/avery/en_us/Templates-%26-Software/Templates/Blank-Templates/Cards/Business-Cards/Business-Card-_-wide-10-per-sheet_Microsoft-Word.htm?N=0&refchannel=c042fd03ab30a110VgnVCM1000002118140aRCRD
Third - Have scissors handy or a paper trimmer/cutter
Optional - 3x5 little baggies to put biz card and "freebie" in.
** I used Photoshop to create part of my design and that was because I am impatient and had to cut over 300 by myself :), the tutorial though is shown in Word**
Open go to the Avery site mentioned above and download the template.
Come up with what you want yours to look like.
(if you have photoshop or an image maker, biz cards are 3x5)
I decided to make mine look like as much of a coupon as I could. (This is where I flipped to Photoshop because the tabs and borders of Word where upsetting me)
Here comes the pics!!
Step One:
use the line tool at the bottom of the page to draw dashed lines. (hold shift down while drawing and you get a straight line)

Step Two:
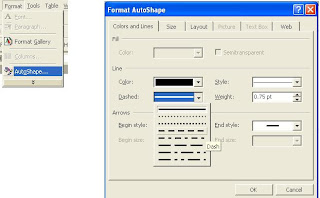
To make the line dashed go to "format" then select "auto shape" and I used 4pt width for my dashes
Step Three:
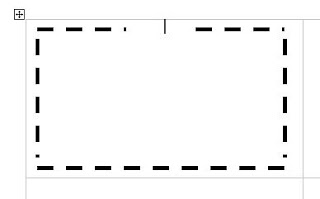
I wanted dashed lines and scissors. So to do that I drew the bottom line and vertical (side) lines all the way across. Then the top lines I drew 2 and separated them with a space in-between for scissors.
Step Four:
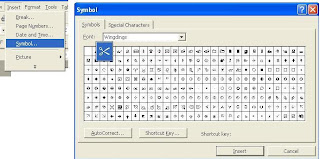
To make the scissors, go to "insert" then "symbol" pick the font "Wingdings" from the drop down menu and the scissors are the second symbol in the chart.
Step Five:
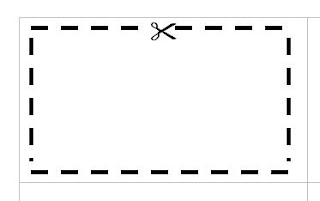
I chose to make my scissors bold and size 22pt
Step Six:
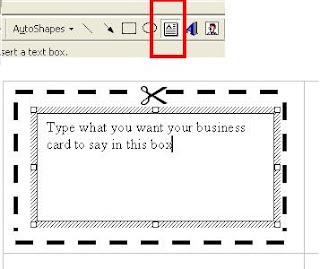
To make your text inside the dashed lines, without the hassle of a billion enters and a trillion spaces to make sure it fit and looked right. I used the text box tool at the bottom of the screen.
Step Seven:
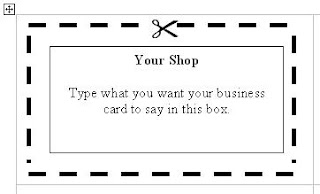
This is what it will look like after entering your information, of course you can doll it up and pick any font and color you want to!
Step Eight (optional):
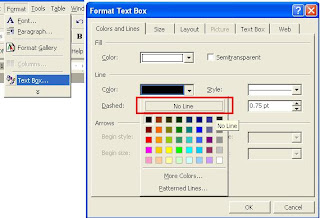
I can't stand not being able to make the text box completely center and therefore the line around the text box looks weird, so I take it away.
Make sure the text box is highlighted ( it will have a shadow thing around it). The choose "format" then "text box" then I choose "no line"
Step Nine:
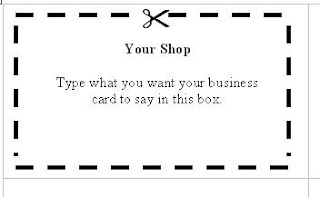
This is how it looks with the line removed
Step Ten:
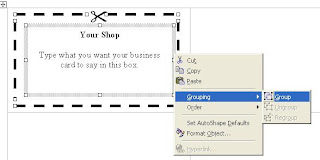
This is to group everything together so you can continue to copy it straight down the page and not have to do step 1-9 nine more times.
Hold Shift down and click every line and the top of the text box. Then right click on top of one of the lines and then choose "grouping" and then press "group".
Step Eleven:
This is where you go copy & paste nuts!! :D
Right click on one of the lines and go to "edit" and press "copy" or for lazy folks like me (Ctrl + C). Then click in the next business card to the bottom or side and go to "edit" and press "paste" or Lazy: (Ctrl + V).
Notice the Scissors do not come with it..but have no fear...copy & paste is here!!
Go over to your first scissors, highlight them, press copy and then go over to your new card and press paste!!

THE END!!
oh yeah.. and here's mine.. and yes..I had to make a gillion of them because each lip balm needs a card!! and guess what...you get the discount too..score # 2 for you!
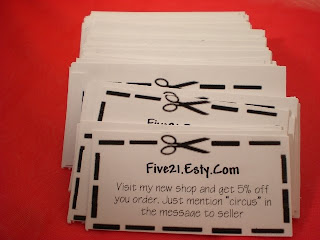
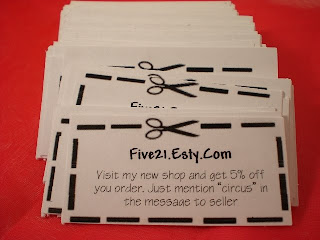
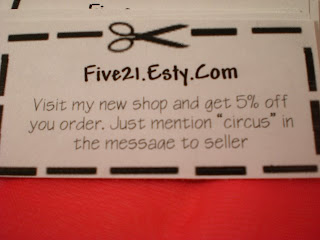
TA DAH!!!
Hope you have a great day!!
~*Carlee*~
I decided to make my own and I'll share it with you. I decided to make mine dual purpose: business card/coupon.
Ingredients ;)
First - get cardstock (I decided to get mine from walmart..it's the only thing in town and I'm impatient) :P (it was 110lb which is a little lighter than normal, but still a great thick feel and it was 5.95 for 150 sheets)
Second - get business card template @ http://www.avery.com/avery/en_us/Templates-%26-Software/Templates/Blank-Templates/Cards/Business-Cards/Business-Card-_-wide-10-per-sheet_Microsoft-Word.htm?N=0&refchannel=c042fd03ab30a110VgnVCM1000002118140aRCRD
Third - Have scissors handy or a paper trimmer/cutter
Optional - 3x5 little baggies to put biz card and "freebie" in.
** I used Photoshop to create part of my design and that was because I am impatient and had to cut over 300 by myself :), the tutorial though is shown in Word**
Open go to the Avery site mentioned above and download the template.
Come up with what you want yours to look like.
(if you have photoshop or an image maker, biz cards are 3x5)
I decided to make mine look like as much of a coupon as I could. (This is where I flipped to Photoshop because the tabs and borders of Word where upsetting me)
Here comes the pics!!
Step One:
use the line tool at the bottom of the page to draw dashed lines. (hold shift down while drawing and you get a straight line)

Step Two:
To make the line dashed go to "format" then select "auto shape" and I used 4pt width for my dashes

Step Three:
I wanted dashed lines and scissors. So to do that I drew the bottom line and vertical (side) lines all the way across. Then the top lines I drew 2 and separated them with a space in-between for scissors.

Step Four:
To make the scissors, go to "insert" then "symbol" pick the font "Wingdings" from the drop down menu and the scissors are the second symbol in the chart.

Step Five:
I chose to make my scissors bold and size 22pt

Step Six:
To make your text inside the dashed lines, without the hassle of a billion enters and a trillion spaces to make sure it fit and looked right. I used the text box tool at the bottom of the screen.

Step Seven:
This is what it will look like after entering your information, of course you can doll it up and pick any font and color you want to!

Step Eight (optional):
I can't stand not being able to make the text box completely center and therefore the line around the text box looks weird, so I take it away.
Make sure the text box is highlighted ( it will have a shadow thing around it). The choose "format" then "text box" then I choose "no line"

Step Nine:
This is how it looks with the line removed

Step Ten:
This is to group everything together so you can continue to copy it straight down the page and not have to do step 1-9 nine more times.
Hold Shift down and click every line and the top of the text box. Then right click on top of one of the lines and then choose "grouping" and then press "group".

Step Eleven:
This is where you go copy & paste nuts!! :D
Right click on one of the lines and go to "edit" and press "copy" or for lazy folks like me (Ctrl + C). Then click in the next business card to the bottom or side and go to "edit" and press "paste" or Lazy: (Ctrl + V).
Notice the Scissors do not come with it..but have no fear...copy & paste is here!!
Go over to your first scissors, highlight them, press copy and then go over to your new card and press paste!!

THE END!!
oh yeah.. and here's mine.. and yes..I had to make a gillion of them because each lip balm needs a card!! and guess what...you get the discount too..score # 2 for you!


TA DAH!!!
Hope you have a great day!!
~*Carlee*~
Friday, April 17, 2009
Half Way There!!
As of yesterday..I'm a BUSINESS!!!
I got my post office box and my DBA or Assumed name recorded!!
Now...I just need an EITN (tax ID#) and to be listed in the yellow pages(that may not be needed...I'm checking up on the FDA rules of labeling cosmetics)
WOO HOO!!
I got my post office box and my DBA or Assumed name recorded!!
Now...I just need an EITN (tax ID#) and to be listed in the yellow pages(that may not be needed...I'm checking up on the FDA rules of labeling cosmetics)
WOO HOO!!
Thursday, April 16, 2009
Breakin the Silence
I've been quite and haven't blogged the past few days...but I wasn't neglecting my crafty side!!
Check these new bad boys out!!
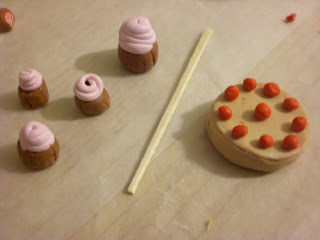
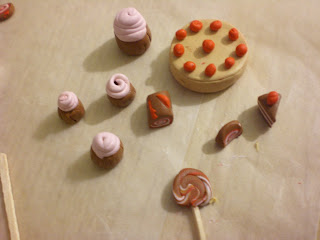
These were made with no special clay tools...only my hands, wax paper and a barely sharp knife...cause I would cut my arm off with an xacto knife...just by looking at it!
Tomorrow...there's ANOTHER crafty reveal!!
Check these new bad boys out!!


These were made with no special clay tools...only my hands, wax paper and a barely sharp knife...cause I would cut my arm off with an xacto knife...just by looking at it!
Tomorrow...there's ANOTHER crafty reveal!!
Labels:
bracelets,
charms,
earrings,
miniature food,
necklaces
Friday, April 10, 2009
Joyus Texas!
I'm ecstatic about being back in Texas for Easter/Spring Break!!!
The 4 hour drive..is very worth it....oO(well the going to Texas trip is worth it..not the returning to Louisiana trip..lol)
I've got many new things up my sleeve...that will be posted shortly. I will also be posting my favorite yummy foods with recipes...that won't leave your wallet empty!!
I'm the queen of EMPTY WALLET...but that's what happens when you return to school full time...and in a different state. :P
Well I'm off to bed...(couch actually).
~*Carlee Rachelle*~
Subscribe to:
Comments (Atom)


